Friday, December 28, 2012

Murals: Marvel Edition - Stage 8

I was able to focus on the Thor and Loki mural today, completing quit a lot! :)

I completed Thor's cape, and also the armor on Loki.

I made the black lines around Loki, and the cape darker and bolder, so that it's easier to see.

I also fixed Loki's eye and ear. There was some other paint that covered the details on those two areas.


Thank you for reading! Please share the link to my blog! Thanks again!

Note: I do not own any copy-written characters above.

Thursday, December 27, 2012

Paper Mache: Loki Scepter - Stage 5

Almost done with the paper mache Loki scepter I've been working on!

I applied the a coating that hardens the scepter. All I have left to do on this paper mache project is to paint it! :)

Note: I do not own any copy-written character above!!

Paper Mache: Tesseract - Completed!

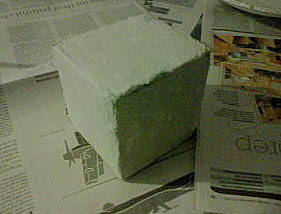
Well, I have finally completed the paper mache Tesseract cube from the Avengers!!! :D It's taken a while, because it took time to get the needed materials, but it is completed nevertheless!

First stage: created the cube by glueing cardboard squares together.

Second stage: covered the cube with masking tape.

Third stage: used a paper mache clay recipe I found (this is the link - http://ultimatepapermache.com/paper-mache-clay) and covered the cube.

Fourth stage: sanded the cube that is covered in the paper mache clay.

Fifth and Sixth stage: I applied a coating that hardens the cube, and after sanding that, I painted it.  

Almost done with Loki's scepter, as well! I just have to paint it! :) Should be completed soon! Thanks for reading - please comment on and share my blog!

Note: I do not own any copy-written characters above!!

Murals: Marvel Edition - Stage 7

Got quite a bit of the mural completed today. I've almost finished all of Thor's cape.

The paint is very thin, so I have to make apply 2-3 coats of paint. 

I was also able to apply the peach colored paint I got recently, onto Loki's hands and face. Again, I'm going to get take black paint, and apply it over to the top of the black areas, so that those parts are bolder. I also am going to have to repaint his eye, because the paint accidentally covered it. 

Note: I do not own any copy-written character above!!

Murals: Marvel Edition - Stage 6

I've been able to complete a lot of work on my murals recently. Here are some updated pictures:

The light dots that you can see on Loki's armor that's on his chest, will be colored black. I will be going over all of the black areas again, so that you can see the shading is supposed to be, and to also fix any placed where the paint covered other parts of the mural. 

I will be trying to paint his skin/his face and hands soon as well, since I finally got the paint I needed.

I got most of what I wanted to complete, done so far. I'm going to start working on Thor and his cape next. 

Note: I do not own any copy-written character above!!

Friday, December 21, 2012

Murals: Marvel Edition - Stage 5

Hey there everyone! I have finally gotten a chance to work on the Marvel murals! 

This is a before shot of what the mural looked like when I first started painting it.


What the mural looks like so far. Tomorrow I plan to finish the gold on Loki's helmet, and his armor. As well, I will be going over the green again, to make the color a little more even.


I'm not happy with the way Thor is drawn, but I'm not focusing on that side of the mural - I will redraw his facial features until I like them, later. I really just wanted to get an idea of where he will be in the painting - not what his face will look like. 

I needed Thor to at least be in the drawing, so that I could map out where everything else should be (the rocks, his cape, his leg, etc.). Right now, I'm trying to complete Loki, the background, and all of the rocks/rubble that is in the painting. 


 A close-up of the mural. As you can see, once this coat of paint dries (the paint is very thin), I will apply the second coat to it, to make sure that all of the green is the same and even. I'm also hoping to paint his skin tomorrow as well. 

Note: I do not own any copy-written characters above!!

Saturday, December 15, 2012

The Hobbit Characters - Gollum

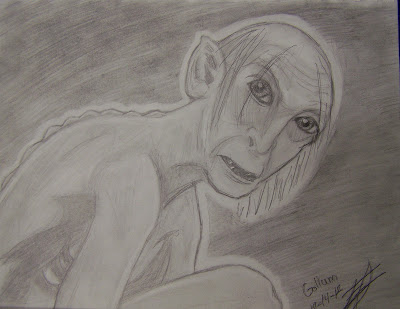
Hey everyone! I'm sorry I haven't posted any new drawings for a long time. Here is one I just completed, though!

This is Gollum from the Lord of the Rings. I drew this after watching the new film: The Hobbit: An Unexpected Journey.

This drawing was inspired by the new live-action version of the character, and also by the animated version, for the animated, "The Hobbit," movie from 1977. (Examples are shown below)

1977 version of Gollum

The modern version of Gollum

I will be drawing more Lord of the Rings characters soon! :) 

Note: I do not own any copy-written characters or photos above!!

Saturday, December 1, 2012

Finally - A New Post!

Happy December 1st everyone!! :D I've finally gotten a chance to draw lately! Here they are!


Thank you so much for reading! :) 

Note: I do not own any the copy written characters above!!

Tuesday, November 6, 2012

Most Recent Drawings

I haven't gotten a chance to draw or work on my paper mache project lately, because I've been so busy. Anyway, here are some of my recent drawings. :)


With luck, I'll find some more time to devote to my art projects in the coming weeks. Thank you so much for reading! Please share my blog! 

Note: I do not own any copy-written characters above!!

Saturday, November 3, 2012

Loki Pumpkin

Hello again everyone! Recently I have been working on a pumpkin inspired by the character, Loki, for a pumpkin decorating contest. In the contest, submissions are unable to be carved as the pumpkin wouldn't last very long.


As you can see half of the face is the Frost Giant side, and the other half is the human side of him.


Hope you've been enjoying my blog! Thank you for reading!

Note: I do not own any copy-written characters above!!

Thursday, October 25, 2012

Paper Mache: Loki Scepter - Stage 4

Hello everyone! I've been really busy lately, so I haven't gotten a chance to update my blog recently.

I've been able to cover the scepter with paper mache clay, but I still have to put the coat to harden the sculpture.

This is one side of the scepter...

... and this is the other. 

I had to cut part of the scepter towards the top. I watched the Avengers a few more times since I started this project, and I began to realize that the spear part of the scepter was significantly shorter that I had made it originally. 

Here are all of the steps that I've taken to complete this project:
1. I drew the shape of the spear on some cardboard and used that shape to trace a second template.
2. Then, I placed the 2 pieces together and glued them, placing pieces of cardboard towards the handle to give it a 3D look. 
3. I then wrapped the sculpture base in masking tape. 
4. Using paper mache clay (the recipe is at: http://ultimatepapermache.com/) I covered the object in the clay.
5. Using pencil, I drew the places where the engraving on the scepter should be, and then applied glue over those places to act as barriers. 
6. Using more clay, I applied another layer of the clay on top of the sculpture. 
7. I then used sandpaper to give the sculpture a more even finish. 

As I said, I still have to apply the hardening coat on the sculpture. Once that's done, I can finally paint it!

I hope you've enjoyed the progression of this project! Please share my blog! Thank you! :)

Note: I do not own any copy-written characters above!!

Saturday, October 6, 2012

Paper Mache: Loki Armor - Stage 2

I was actually able to apply the paper mache clay last night onto the pieces of the Loki armor I've made!


This is the shoulder armor from a view of the front.

A view of the back of the shoulder armor.

A side view of the shoulder armor. This is the side were the neck goes, and other side is were it ends.


The metal part on the belt that extends from the shoulder armor.


The collar part that is in the 


Today, I got the chance to sand these pieces. These pictures are not of the what they look like sanded. They're pretty much the same - the only difference is that the armor pieces have a smoother surface. I'm actually able to get into the final stages of making these pieces now! Hope you've been enjoying seeing the progress in my work! :)

Note: I do not own any copy-written characters or photos above!!

Thursday, October 4, 2012

Paper Mache: Loki Armor - Stage 1

I've been making some Loki armor out of paper mache. This is the armor from the Avengers movie (as the style differs from the Thor movie greatly), but not the full version that is shown when he goes to New York and Germany. (I WILL be trying to make the helmet though!) This is the armor that Loki wears most of the time. 


As you can see, this is only one part of the shoulder armor. I haven't started working on the second part yet, but I think it'll turn out pretty well. 


If you look closely, you can see the snake detail at the top. I couldn't find a better picture to show this part of the armor than the one below. 


This is the collar part, up by the neck area.


Hope you're enjoying my blog! I'm trying to get more of the scepter and the Tesseract done, but right now I need to get some sandpaper so that I can add more detail soon! I also will be applying the paper mache clay to the armor pieces I've made, shown above. Once those things are done, I can begin working pieces of armor for the arms. Thank you for reading! :)

Note: I do not own any copy-written characters or photos above!!